Project Breakdown: Sermon Bumper Video
An all-access, behind the scenes look at how this Sunday bumper video featuring hip hop artist Propaganda was made.

How do you make an attention getting/mood setting sermon bumper video for your church?
I'm not sure that I know the perfect answer, BUT I'll tell you what we did for this one....
A few years back when I worked full time for Rock Church we would make sermon bumpers for every sermon series. Sometimes they were super ambiguous montages of imagery (WE GOT THAT B-ROLL!), other times motion graphic pieces, occasionally short narratives, and this time - a music video featuring hip hop artist Propaganda.
In true church filmmaking fashion, we kind of just figured things out as we went and although the process of creating it was last minute and a little dicey it ended up turning out pretty good (or at least I think so).
Before we dive into how we made this, take a second to watch the finished film:
Production Breakdown of How We made it:
In this video I dive pretty deep into all aspects of this project from inspiration, to conceptualization, to execution. I’d recommend watching it all the way through, but below the video I’ll list some of the cinematography & lighting highlights from the video.
Also, at the bottom of this post is perhaps the most valuable material of the whole post: I edited a 14-minute raw, behind-the-scenes video where you can watch the whole production day like a fly on the wall to see exactly how we made this film including some really fun outtakes with Propaganda.
THE CAMERA EQUIPMENT
Canon C500
This project was a while back so we were using the ORIGINAL Canon C500! (I think we were 1 of the 10 people who actually bought this camera, ha)

In order to shoot in 4K RAW we paired the camera with the Odyssey 7Q external monitor/recorder. This also gave us the option to record in 4K 10Bit ProRes4444 as well, but for this one we stuck with RAW.
Lenses
For this project we wanted it to look different than anything else we had created, so we decided to shoot in anamorphic. This gave us that extra-widescreen 2.35:1 look AND it gave us all the lens flares we could handle.
At the time of our shoot there weren’t very many anamorphic options when working with a Canon EF mount camera, so we grabbed the most available one: the Letus AnamorphX adapter.

Since this was just an adapter, it allowed us to use our existing Canon EF still photo lenses. By adding the included step-up rings we fit the AnamorphX snug to the end of the lens just like you would a matte box.

We ended up shooting the performance section of the film on the Canon 50mm EF f/1.2 and the Canon 100mm EF Macro f/2.8 lenses. In retrospect, I think we probably should have used wider lenses and gotten closer to Prop, BUT as you’ll see in the BTS videos there was a very specific reason we were pigeonholed into using longer lenses.

Camera Support
To create the hand-held feel for this shoot we put the camera on a rig that I frankensteined together using pieces from the Shane Hurlbut MCS ShoulderCam Bundle and a few Redrock Micro parts.
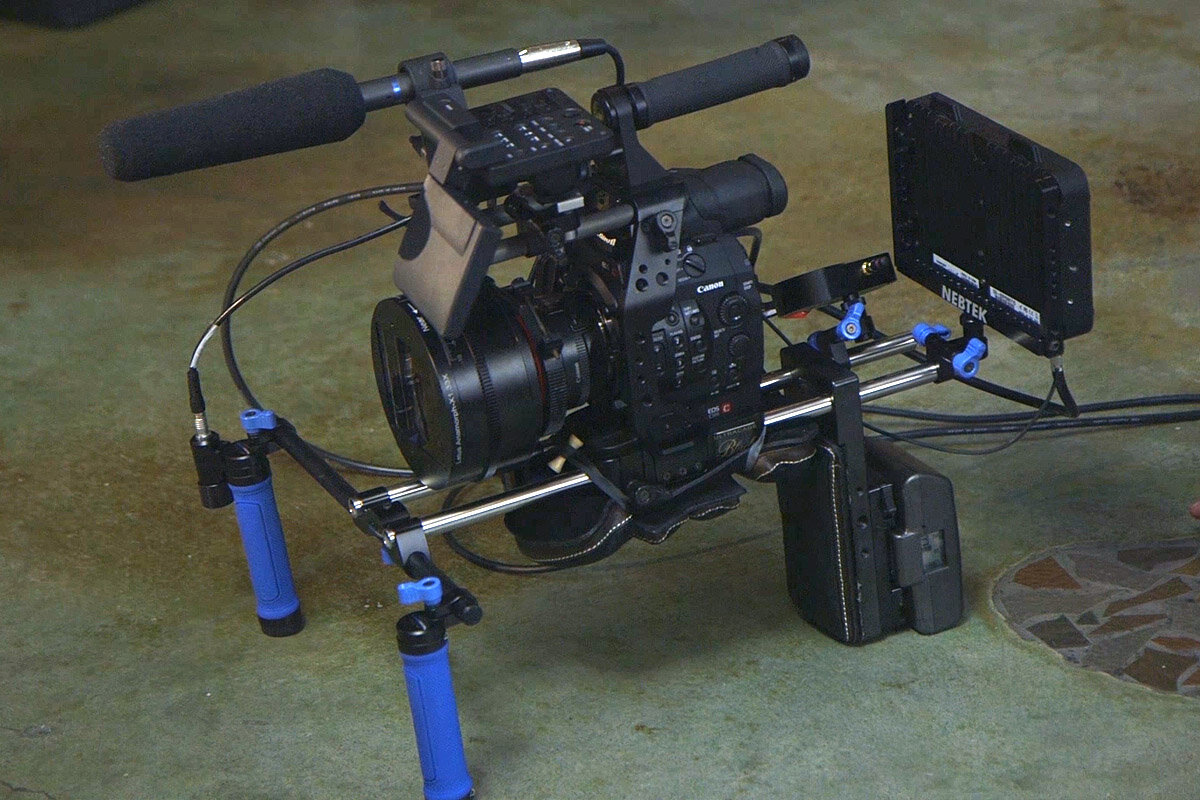
We also used the Redrock microRemote Handheld Kit which allowed Jesse (our camera operator) to pull focus via the fingerwheel on his handgrip so he could keep both hands on the handles for better camera control.
The Redrock kit was the forerunner to the Tilta Nucleus-M system (which I would recommend over the Redrock system). The Nucleus system has great reviews and is a fraction of the cost.
If you wanted to recreate what we used, this Tilta Partial Kit would be the exact equivalent at 1/3 of the price.
LIGHTING & GRIP EQUIPMENT

Key Light
We were a little limited by our budget, gear, and the location, but I wanted to create a soft, top-source for our key light. We rented a 1.2 HMI and bounced it overhead into a 10’x10’ frame of bleached muslin. We also placed a full CTO gel on it to warm up the light because it’s daylight balanced because our backlights and practicals in the shot were all tungsten sources.
The light ended up being overkill and when I filled the whole muslin bounce with the light, it made the scene look way too flat and evenly lit so I wasted most of the light off the corner of the muslin cloth.
This also helped the light bounce in at a little more of an angle to give Propaganda a lighter side and darker side of his face - which looked more dynamic.

If I had it to do over again I probably would have tilted the overhead frame more and pushed it further behind Prop so he was more backlit to increase the overall vibe, but I think it still turned out pretty cool.
Back Light

For our backlights we used three Arri 650 Fresnel Lights behind Propaganda and the underground crowd. This gave everyone a harsh back edge to keep things feeling, well, edgy.

Having such strong backlights from all three angles also allowed us to bring the exposure down for our key light which helped put Propaganda and everyone in the crowd in the shadows (which was a key point in making 15 people look like 50!).

As long as your subject is backlit, you can get away with their face darker and underexposed. However, if you take that backlight away you’re left with a dark mush.

What really gave the backlight that special quality was the atmospheric haze that we added to the scene before each take. This added shafts of light across the scene, caused the actual light sources to bloom when out of focus, and it also helped obscure the crowd in the background - making it harder to tell how many people are really back there.

The J.J. Abrams Special
Because no anamorphic project should go without AS MANY FLARES AS POSSIBLE!!!!, I rented a specialty xenon bulb flashlight (the ones that are used in every movie ever) to shine right into the lens.


Throughout the performance my buddy Evan would randomly shine the beam of the searchlight across the surface of the anamorphic adapter to add some flare-tastic craziness to the shots.

Overall, it was a ton of fun to direct this project!
Raw, Behind-the-scenes footage:
If you have any questions that weren't addressed in the videos, hit me up on YouTube or Instagram @francois !
JOIN CHURCH FILMMAKERS FROM ALL OVER THE WORLD
Enter your first name and email below and you'll get exclusive tips, tricks, and trainings delivered straight to your inbox. As a bonus for signing up I'll send you our favorite filmmaking trick that I use on every testimonial film I create.